The making of "Long May it Wave" AND Blogger's Quilt Festival
I didn't post much while making Long May it Wave because its owner, Cindy, reads my blog and I didn't want to risk the chance of her finding out about it--I wanted it to be a surprise. Now that it has been gifted, I can share the process. This is a very long post because I talk about the entire process and I am a process kind of girl, so fair warning. AND I decided to enter this quilt in the Blogger's Quilt Festival that starts today.
This quilt began with the germ of an idea based on a quilt I saw on Pinterest--as soon as I saw it I was in love with it. I showed it to the hubster and he said, "Can't you do something different? Like make a flag waving in the breeze?" So down the rabbit hole I went seeking photos of flags waving in the breeze. I found this stamp:
I tend to over-think things when I'm working on a quilt--especially if I'm creating the pattern. I studied this image and determined angles, and calculated the size based on the fabric I purchased.
And about the fabric I purchased: Remember that post where I talked about beginning the project back in June? The fabric in that post was the intended background. It's from a Benartex line called "United We Stand" by Kanvas and I thought it would be perfect. I had purchased 1-1/2 yards of it thinking that would be enough, and I would come up with something else for the border. But when I got it up on the design wall and put a few blue circles on it, I was less than impressed:
 If I had started with the white circles I probably would have kept on plowing, but the blue was the acid test for me. I left it up on the design wall the entire month of June hoping it would speak to me, but it didn't.
So I decided to go fabric shopping and lucky for me, Island Batik produced their "Quilted in Honor" line of batiks. I purchased 2 yards from Batiks Plus (rocking prices and service, BTW) of this fabulous sand camo-like batik:

When it arrived, I washed it and put it on the design wall, and drew my angle lines, and the outlines for the star field and stripes. I used an orange Frixion pen to draw the lines which were later removed by a blast from my iron.
Then I started cutting circles: I have mentioned several times that I own an Accuquilt Studio cutter. I wouldn't recommend attempting this type of project unless you have a die cutter. There are several hundred circles on this quilt and I would be working on this quilt for the next 10 years if I had to cut these by rotary cutter or hand.
I have a die with 7 different sized circles, ranging from 3/8" to 2". I cut red, white and blue swatches from my scrap stash and adhered Pellon EZ Steam Lite II (which I do NOT recommend and will discuss more on that product in another post) to the wrong side of each of the swatches, placed them on top of the die and ran them through the cutter. This is where I had lots of help--the hubster probably cut at least half of the circles for me--thanks, honey!
Then the placement began. I started with the blue field:
 Notice those partial circles on the edges--that was the hubster's idea. I didn't like it. I also felt like I didn't have enough of the almost turquoise circles. I decided to let it stew a while while I worked on the stripes, starting with red:
 My goal was to end each stripe with the tiniest of circles. But once I reached this point and stepped back, I realized that the stripes were not long enough. I drew another outside line and extended the width:
 I moved the tiniest circles to the new edge. Much better!
At this stage, our youngest granddaughter Maykayla, who was 6 at the time, wanted to help. Grandpa would peel the paper from the circle and hand it to her, and she placed it on the background. Right at eye level. Some rearranging took place after she left, but I love how much she wanted to be a part of the process! Next summer we'll work on a project together for her.
And we had to cut more circles. And buy more EZ Steam Lite II.
I went back to the blue field and added more of the almost turquoise circles and took away those partial edge pieces. That just wasn't going to work. This was when I was happy with the blue field:


At this point I had to fuse ALL OF THOSE CIRCLES. I did a light hit on it with the iron while it was still on the design wall because with all of the heat and humidity around here, I was concerned that some would fall off. I then moved the top to my ironing board and did the actual fusing with a wet cloth and lots of steam. (Again, more about the Pellon product in another post.)
A word about pre-washing your fabrics. I don't always do it, but if I'm fusing, I pre-wash. And if I'm using red or navy and they are coming anywhere near a fabric that may be considered a medium or light in value, I'm washing them. However, not all of the reds in my scraps had been pre-washed and I realized that AFTER I fused. I don't have any close-ups of the bleeding, but it wasn't bad, and I'm guessing that some of this may have been inevitable because even if you pre-wash a red, you can still have some bleeding. I didn't believe it harmed the integrity of the quilt and moved on.
Then it was border time. I decided to make a red, white and blue mitered border, then added the previously rejected United We Stand fabric for the outer border. The mitered border finishes at 3". The outer border is 7" at the top and bottom and 3.5" at the sides. I wanted this to be a lap quilt and it needed more at the top and bottom and less at the sides to be an acceptable lap-sized quilt.
And now we come to the part that caused me some real doubts about my abilities--the quilting. I wanted to keep it simple because of the approaching deadline (at this point I was about 10 days out). I wanted to stitch down all of the circles because they were raw-edged and fused, then wavy lines in the background, and cross-hatching in the borders.
I used a new (to me) tool for the cross-hatching: the Westalee Crosshatch System. I had purchased the system in July intending to use it on the customer quilt but had not yet tried it out. I like it, but I think I'm going to follow the recommendations of some other users and get some rubber gaskets to help keep the Chicago screws that are used to hold the ruler in place. I had a few wobbles while using it and I need to get positioned better when I use it.
But the circles...oh, those circles. I wanted to use invisible thread to stitch down the circles. I started out using Monopoly smoke invisible thread and blew through the blue field with no problems. Once I moved on to the red I experienced a lot of skipped stitches and of course, the dreaded gumming up of the needle. I couldn't go through a third of a stripe without stopping, removing the needle, cleaning it and dabbing some oil on it before I had to repeat the process. Then I started getting the skipped stitches and couldn't figure out what was going on. I changed out the Monopoly thread to Invisafil 100 wt. polyester thread. I even brought over the iron and repressed with steam (while it was on the longarm) to make sure I had the glue completely steamed. I tweaked and tweaked and tweaked for over 10 HOURS and finally sat down at the laptop and did some research. I then learned that I would have to use a heavier thread and a bigger needle. Once I did that, it took me 15 minutes to stitch the white circles and about 20 minutes to stitch the red. What a waste of precious time! But I learned something in the process and I'm better off for it.
I then used YLI Pyramids of Giza for all of the background and cross hatch quilting. I quilted in the lines between the stripes and outside the blue field, then stitched wavy lines at the top, bottom and sides to mimic the waving of the flag. I thought the thread worked beautifully with these fabrics.


My biggest faux pas on this quilt was a doozy--I unintentionally went "off the rails" so to speak while doing the cross hatching and had a rectangle instead of a square in the lower right hand side of the quilt. I decided to quilt Cindy's initials in the rectangle. But when I quilted them, I got them in the wrong order...but she didn't mind (and no photo)!
The finished quilt:

The back:

The bias binding is the same fabric used for the inner blue border and is also from the Island Batik Quilted in Honor fabric line. The binding was completely stitched by machine.
I'm one of those quilters that typically doesn't like to make the same quilt twice because there are so many out there that I want to make! But this is one I would make again, and might even make one for myself.
I busted 11 yards on this quilt! I purchased this year everything on the top except for what was used for the circles (now known as bubbles thanks to my co-worker Patti), and the backing came from a piece I had for years and had just enough, along with some of the red from the inner border.
Threads used: YLI variegated thread in Pyramids of Giza, Superior Threads Monopoly in Smoke for the blue bubbles, Superior Threads So Fine 401 Snow in 50 wt. for the white bubbles, Glide Cairo-Quilt in Candy Apple for the red bubbles, and Glide's Magna-Quilt bobbins in Candy Apple.
The last two photos are courtesy of Cindy. Here's the original post where I gave it to her.

If you've made it this far, thanks for listening to me prattle about my process.

Please enjoy the Quilter's Blog Festival. I plan to spend some quality time over the next few days admiring all of the quilts. My entry is in the Applique category.
Go quilt!

This quilt began with the germ of an idea based on a quilt I saw on Pinterest--as soon as I saw it I was in love with it. I showed it to the hubster and he said, "Can't you do something different? Like make a flag waving in the breeze?" So down the rabbit hole I went seeking photos of flags waving in the breeze. I found this stamp:
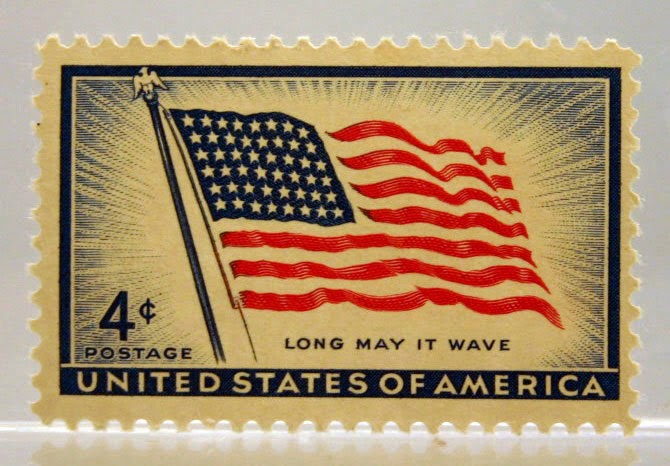 |
| This stamp was issued on July 4, 1959, and note the saying, "Long May it Wave". |
And about the fabric I purchased: Remember that post where I talked about beginning the project back in June? The fabric in that post was the intended background. It's from a Benartex line called "United We Stand" by Kanvas and I thought it would be perfect. I had purchased 1-1/2 yards of it thinking that would be enough, and I would come up with something else for the border. But when I got it up on the design wall and put a few blue circles on it, I was less than impressed:
So I decided to go fabric shopping and lucky for me, Island Batik produced their "Quilted in Honor" line of batiks. I purchased 2 yards from Batiks Plus (rocking prices and service, BTW) of this fabulous sand camo-like batik:

When it arrived, I washed it and put it on the design wall, and drew my angle lines, and the outlines for the star field and stripes. I used an orange Frixion pen to draw the lines which were later removed by a blast from my iron.
Then I started cutting circles: I have mentioned several times that I own an Accuquilt Studio cutter. I wouldn't recommend attempting this type of project unless you have a die cutter. There are several hundred circles on this quilt and I would be working on this quilt for the next 10 years if I had to cut these by rotary cutter or hand.
I have a die with 7 different sized circles, ranging from 3/8" to 2". I cut red, white and blue swatches from my scrap stash and adhered Pellon EZ Steam Lite II (which I do NOT recommend and will discuss more on that product in another post) to the wrong side of each of the swatches, placed them on top of the die and ran them through the cutter. This is where I had lots of help--the hubster probably cut at least half of the circles for me--thanks, honey!
Then the placement began. I started with the blue field:
At this stage, our youngest granddaughter Maykayla, who was 6 at the time, wanted to help. Grandpa would peel the paper from the circle and hand it to her, and she placed it on the background. Right at eye level. Some rearranging took place after she left, but I love how much she wanted to be a part of the process! Next summer we'll work on a project together for her.
And we had to cut more circles. And buy more EZ Steam Lite II.
I went back to the blue field and added more of the almost turquoise circles and took away those partial edge pieces. That just wasn't going to work. This was when I was happy with the blue field:
And finally, I was happy with all of the circles:
At this point I had to fuse ALL OF THOSE CIRCLES. I did a light hit on it with the iron while it was still on the design wall because with all of the heat and humidity around here, I was concerned that some would fall off. I then moved the top to my ironing board and did the actual fusing with a wet cloth and lots of steam. (Again, more about the Pellon product in another post.)
A word about pre-washing your fabrics. I don't always do it, but if I'm fusing, I pre-wash. And if I'm using red or navy and they are coming anywhere near a fabric that may be considered a medium or light in value, I'm washing them. However, not all of the reds in my scraps had been pre-washed and I realized that AFTER I fused. I don't have any close-ups of the bleeding, but it wasn't bad, and I'm guessing that some of this may have been inevitable because even if you pre-wash a red, you can still have some bleeding. I didn't believe it harmed the integrity of the quilt and moved on.
Then it was border time. I decided to make a red, white and blue mitered border, then added the previously rejected United We Stand fabric for the outer border. The mitered border finishes at 3". The outer border is 7" at the top and bottom and 3.5" at the sides. I wanted this to be a lap quilt and it needed more at the top and bottom and less at the sides to be an acceptable lap-sized quilt.
 |
| Sorry about that towel in the corner... |
 |
| Cindy's label was pieced into the backing |
But the circles...oh, those circles. I wanted to use invisible thread to stitch down the circles. I started out using Monopoly smoke invisible thread and blew through the blue field with no problems. Once I moved on to the red I experienced a lot of skipped stitches and of course, the dreaded gumming up of the needle. I couldn't go through a third of a stripe without stopping, removing the needle, cleaning it and dabbing some oil on it before I had to repeat the process. Then I started getting the skipped stitches and couldn't figure out what was going on. I changed out the Monopoly thread to Invisafil 100 wt. polyester thread. I even brought over the iron and repressed with steam (while it was on the longarm) to make sure I had the glue completely steamed. I tweaked and tweaked and tweaked for over 10 HOURS and finally sat down at the laptop and did some research. I then learned that I would have to use a heavier thread and a bigger needle. Once I did that, it took me 15 minutes to stitch the white circles and about 20 minutes to stitch the red. What a waste of precious time! But I learned something in the process and I'm better off for it.
 |
| You can barely see the Monopoly on the blue field |
 |
My biggest faux pas on this quilt was a doozy--I unintentionally went "off the rails" so to speak while doing the cross hatching and had a rectangle instead of a square in the lower right hand side of the quilt. I decided to quilt Cindy's initials in the rectangle. But when I quilted them, I got them in the wrong order...but she didn't mind (and no photo)!
The finished quilt:
The back:
The bias binding is the same fabric used for the inner blue border and is also from the Island Batik Quilted in Honor fabric line. The binding was completely stitched by machine.
I busted 11 yards on this quilt! I purchased this year everything on the top except for what was used for the circles (now known as bubbles thanks to my co-worker Patti), and the backing came from a piece I had for years and had just enough, along with some of the red from the inner border.
Threads used: YLI variegated thread in Pyramids of Giza, Superior Threads Monopoly in Smoke for the blue bubbles, Superior Threads So Fine 401 Snow in 50 wt. for the white bubbles, Glide Cairo-Quilt in Candy Apple for the red bubbles, and Glide's Magna-Quilt bobbins in Candy Apple.
The last two photos are courtesy of Cindy. Here's the original post where I gave it to her.
If you've made it this far, thanks for listening to me prattle about my process.
Please enjoy the Quilter's Blog Festival. I plan to spend some quality time over the next few days admiring all of the quilts. My entry is in the Applique category.
Go quilt!


Comments
Post a Comment